Does anyone remember that expression “it’s not like I’m sitting around all day eating bonbons?” Was that only something my grandmother and mother said? I’ve always wondered what a bonbon is exactly; per Webster it is “a candy with chocolate or fondant coating and fondant center that sometimes contains fruits and nuts. Or something that is pleasing in a light or frivolous way”.
So these little treats definitely qualify for both of those definitions. They are a healthier version with no refined white sugar. They are gluten and grain free and also paleo if you choose the right chocolate chips – this brand is good for Paleo.
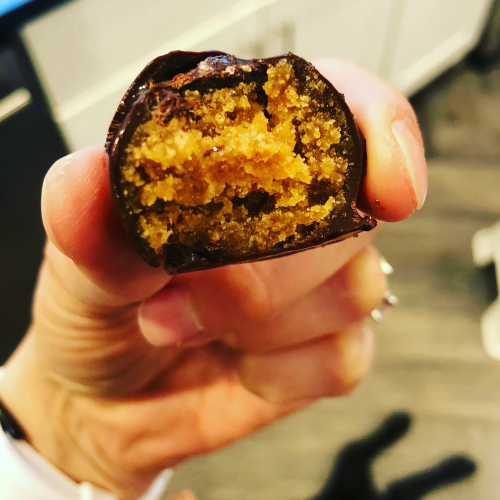
The dates bring a caramel-like flavor and the hefty amount of vanilla adds a wonderful richness.
I may not be sitting around all day eating bonbons… but I can be running around eating bonbons all day!
Chocolate Cashew Butter Bonbons (makes 30)
Ingredients
- 6 Dates pitted and cut in half
- 3/4 Cup cashew butter (I like Trader Joe’s)
- 1/2 Cup coconut flour (Bob’s Red Mill)
- 2 Tablespoons real maple syrup (optional, I like the flavor but if you want them less sweet omit.)
- 1 Tablespoon real vanilla extract
- Water- from 2 tablespoons to 1/4 cup to get desired consistency.
- Himalayan pink salt
- 3/4 Cup dark chocolate chips (or chopped chocolate)
Instructions
- In the bowl of your food processor add dates, cashew butter, coconut flour, maple syrup (if using), vanilla extract & a sprinkle of salt. Pulse until the dates are chopped and the ingredients start to incorporate. Start adding water by the tablespoon to create a dough like consistency. It will turn into a ball as it is processed.

- Line a baking sheet with parchment paper.
- Remove blade from food processor so you can scoop out the bonbon filling.
- Using a teaspoon ice cream scoop (I like this one) or a regular teaspoon, form 1 inch balls, rolling between your hands. Place on cookie sheet.

- Once all of the balls have been formed melt the chocolate chips in the microwave. Using a microwave safe dish (I like a Pyrex measuring cup) start with 30 Seconds, then stir and place back in for another 30 seconds. Do this for 2 minutes total and you should have perfectly melted chocolate.
- Place the bonbon on a fork over the bowl of chocolate and spoon the melted chocolate over it until covered. Place back on parchment lined baking sheet. Repeat with remaining bonbons. Sprinkle Himalayan pink salt over them if desired.

- Pop the whole baking sheet into the freezer to harden the chocolate- about 20 minutes,

8. Store them in a storage container in the freezer- Perfect little treat when you are craving something sweet! (It is wise to let them thaw just a little bit before biting into one!)


Leave a Reply